For those of you who have been following me on Instagram you would know that baking has become my newest obession. Learning how to bake was a part of my 30-by-30 list and somehow, I could only manage to attend a class when I was 30 years, 1 month and 9 days old. But I was super excited and after I attended the workshop, baking seemed easy and overwhelming at the same time.
There were so many ingredients and ratios to keep in mind. Plus you needed to know how to mix, beat, whisk, cut and fold. And you needed so many tools and supplies. I wondered if it would be economical to continue baking as a hobby without investing in so much. But as fate would have it, I came across Bake Me‘s Baking Kits and what started as an experiment, has now become my weekly pastime.
Now before I review this kit, I want to share that I have baked on my own on three separate occasions after using the kit. So there’s an additional persective to this review.
Bake Me Kits
Bake me puts together baking kits that include everything you need for a particular recipe – except the oven and the wet ingredients (milk, oil, eggs, water, etc.) They have around 8 different recipe boxes and each box comes fully equipped with the ingredients, at least 3 reusable tools, recipe and instructions, and an adorable chef’s hat and apron for your kids. Why? because the recipe is easy enough for your children to be able to bake with you (under adult supervision only) and I loved this concept. For me, as I had only attended a baking class, this seemed to be perfect because it required barely any baking knowledge on my part.

To know more about the company and its products, click here.
Bake Me on Social Media – Website | Instagram | Facebook | Twitter
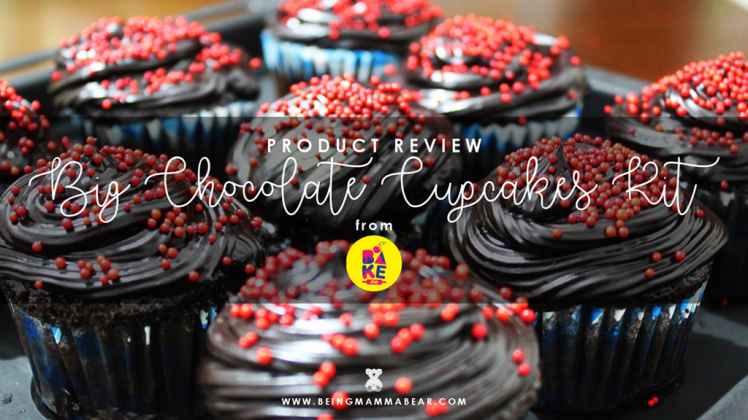
Big Chocolate Cupcakes Kit
Price: INR 1,699/-
The kit I received was the Big Chocolate Cupcakes kit and this is what it included.
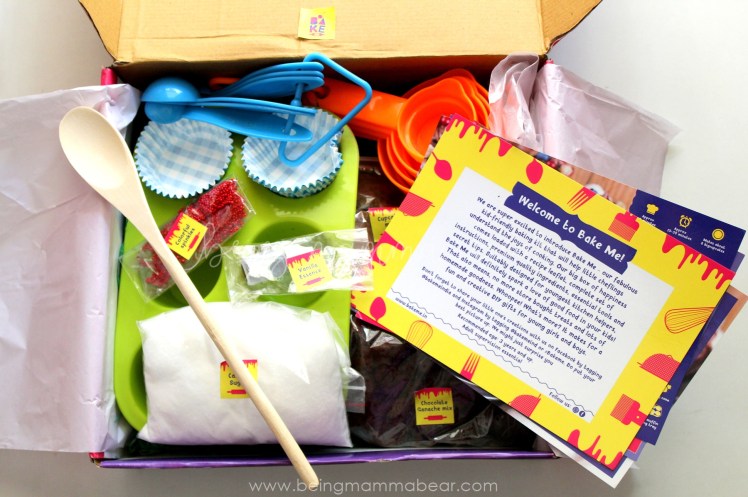
🍰Chocolate Cupcake Mix*
🍰 Castor Sugar
🍰 Vanilla Essence
🍰 Chocolate For Ganache
🍰 Colourful sprinkles
🍰 Silicone Cupcake Mould**
🍰 Paper Cupcake Liners (14)
🍰 Wooden Spatula**
🍰 Dispoable Piping Bag with nozzle**
🍰 Measuring Cups & Spoons**
🍰 Chef’s Hat & Apron**
🍰 Leaflets with recipe, measurements, and instructions.

*If I were to make the mix at home, I would need to measure and add – flour, cocoa, baking powder and baking soda. All of this was measured and mixed in the exact quantities I needed for the recipe. The castor sugar, vanilla essence, and chocolate for ganache were also exactly measured for the recipe so I didn’t have to measure them again before adding.
**These tools are reusable. For the piping bag, even though the bag itself was disposable, the nozzle can be used again.
What I needed
🍰 Oven
🍰 Mixing Bowls
🍰 Whisk or Handheld Blender/mixer
🍰 1/2 cup milk
🍰 1 medium sized egg (I replaced eggs with banana. 1/4 cup mashed banana for every egg)
🍰 1/4 cup vegetable oil
🍰 1/2 cup boiled water
🍰 175 gms heavy cream (for Ganache)
🍰 Large Spoon (for pouring the batter into the mould)
Watch the unboxing video here.
My Experience with Bake Me Kit
Watch the video below to see most of the mixing process. If you have never tried baking before, watch a few baking videos online to know what whisking, aerating, beating, etc. mean and what adding 1/3 of the mix to the wet ingredients means. It is not difficult, but I know that watching someone else do this (at the baking class) increased my confidence to do this by myself.
MY EXPERIENCE | The Process
I did this in two parts. The first day, I just baked the cupcakes and then two days later, I made the frosting. It just seemed a lot less overwhelming that way. Plus the second day coincided with my daughter’s 9-month birthday, so I frosted and lit the cupcakes that day in celebration.
The mixing part was easy peasy. I messed up when I added 1/2 cup oil instead of 1/4, but it wasn’t so bad. With the first batch, I wasn’t sure how much batter I should fill in the cupcake liners so it I underfilled and the cupcakes turned out flat.


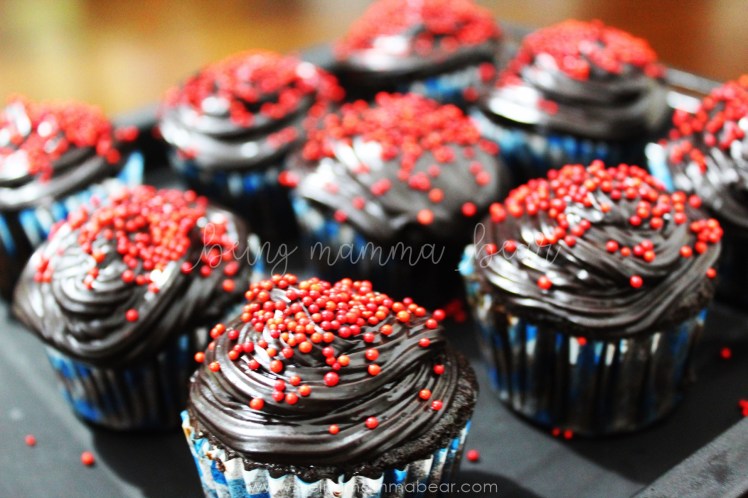
With the second batch, I filled in a little more batter, and I love how round and puffy the cupcakes turned out.


Though I would have loved to take a picture of all cupcakes together, given that we could bake only 6 at a time, some of them got eaten because we (my mother and I) couldn’t control ourselves myself. 🙈

MY EXPERIENCE | What I Liked
I had a gala time when I baked. I was so excited that I didn’t even know how time passed. And since I was sharing everything on Instagram Stories, I’m sure it took longer, but if you are fully focussed, then it shouldn’t take you long at all. If you have never baked before, this should still be a piece of cake (or 15 😜) and you will love the ease:
- I was mighty surprised when the leaflet said that the ingredients could make 8 Big Cupcakes but the kit included 14 cupcake liners. I was even more surprised when I could make 15 cupcakes (but that’s probably also because I underfilled the liners in the first batch, so that gave me one extra cupcake.)
- The instructions were simple, detailed, and easy to follow.
- I didn’t have to measure anything that came in the kit. Everything was in the exact quantity I neeed, even the vanilla essence.
- The piping bag, nozzle (reusable), and the sprinkles made the decoration part very very easy.


- It is packed just before it is shipped so the ingredients are fresh!
MY EXPERIENCE | What Could Have Been Better
The recipe and instructions were very detailed. However, it would have been better if:
- The recipe provided alternatives. For example, butter instead of oil, or what should be used (and how much) if one wants to make the recipe eggless. Sure, I found the answer fairly quickly with one google search, but it would have been super if the recipe mentioned that as well.
- For the ganache even though the chocolate was in the exact quantity we needed, the cream had to be measured and the measurement was in grams (175 grams). Alternative measurement in cups (since measuring cups came with the kit) would have made work a bit easier for novice bakers who don’t have weighing scales.
- Mentioning a use before date. I was told that I could use the box up to 10 days after I received it, but having a date on the box would have been better.
- The size of the liners seemed to be a tad bit larger than the cupcake mould which resulted in the sides getting bunched up like this. This is definitely not a deal breaker but I would have loved it if the liners fit in just right.

WHAT YOU SHOULD KEEP IN MIND
- Test your oven. Each oven is different. So even if you follow instructions to the T, watch those cupcakes and keep checking often. Your cupcakes may take longer or lesser time than that mentioned in the leaflet.
- Double the check the quantities for ingredients you have to measure. I added 1/2 cup oil instead of 1/4 cup and though that wasn’t disastrous, it could have been worse.
- The instructions said that the ganache should be kept at room temperature (which ideally, for a chef is an air conditioned room.) So if the ganache still seems runny after sitting out for a while, pop it in the fridge for 5-10 minutes. Don’t keep it there for too long because you don’t want it to become too hard. That will make it a little difficult to pipe correctly.
CONCLUSION
Overall, my first baking experience by myself was made at least a 100 times easy because I had the kit. Had I done this all by myself, I would have been nervous and made more blunders. It helped to have everything in one place including the tools. I would definitely recommend you try this out. Especially if you have never baked before. You can try baking without investing in ALL the tools by just using one of the Bake Me Kits. That way, almost everything you need is in the kit!


P.S. This kit was sent to me for review, but this is not a paid review. I used this kit myself and all pictures used in this post are mine. All opinions are honest and unbiased.


How scrumptious are those cakes and ganache looking? You totally did a professional job with the icing. I love how the kits are a complete kit to bake, you can open the box and begin. Would make a great gift too.
LikeLike
I hate cooking but I love baking! This kind of readymade bake set is something right up my alley. Less work and great results. I will surely give this a try because those muffins look amazing! When are you inviting me over? 😉 On another note, laddoo in an apron and chef’s hat – priceless! Cutest baby ever!
LikeLike
Yummy! The cupcakes look heavenly. I am craving for some chocolate cupcakes now. The kit looks interesting too. I love baking and this kit looks like something which I can use.
LikeLike
They can make a saint go hungry… They are just yummylicious. I had never heard of this concept of a ready to make a kit. This is the best thing for people like me who have no knowledge of baking but with ready to make ingredients I can bake professionally. The final output that I see in the images looks amazing and quite promising. Last but not the least. Baby S is the star of this blog posts. Looking absolutely comfortable in chef’s role.
LikeLike
You are pro at baking man!! Just look at those pictures love them all.. great kit
LikeLike
My gosh , I am hungry ! And you know what I have started looking for a cake class here.I hope I manage to find one!I loved the pictures too
LikeLike
Wow you done it so perfectly and amazingly. Looks so yummy and chocolaty cup cakes. That kit is quite awesome which makes the process easy and simple for you. Fabulous post and i really like your review
LikeLike
Your pics make me want to eat a ‘cupcake’ right now!!!
LikeLike
Just love the cupcake, You did an amazing job. This has given me a great idea to make some cup cakes for my kids this weekend. Thanks for sharing.
LikeLike
i just loved the final product..and the reason i love the concept of bake me is its children friendly…loved all the pics and honestly it looks too tempting
LikeLiked by 1 person
Thank you so much. Yes, I wish my baby was slightly older so I could involve her in this. But just dressing her up in the chef’s hat and apron was enough for now. And it tasted as delicious as it looked. 😍
LikeLike
I’m in a diet and now I’m super hungry lol!
This kit really looks engaging and seems to have everything from spatula to mounds! Awesome clicks!
LikeLike
Hahaha! Thank you! Sorry to make you hungry, but honestly, I barely did anything. And to get such amazing results for very little work is amazing, right?
LikeLike